Your favorite jacket’s zipper just split, or your trusty backpack’s main compartment refuses to close, leaving your belongings exposed. That heart-sinking moment when a zipper fails can feel like a death knell for an otherwise perfectly good item. But before you banish it to the back of the closet or the landfill, consider a quick repair. Often, all you need are the essential tools and materials for zipper reattachment and a bit of know-how to bring it back to life.
Repairing a broken zipper isn't just about saving money; it's about extending the life of your gear and embracing a bit of DIY empowerment. Most common zipper woes, from a runaway slider to misaligned teeth, are surprisingly fixable right at home.
At a Glance: What You'll Learn
- Most broken zippers are fixable without professional help.
- The right tools make all the difference, especially a good pair of pliers.
- Understanding your zipper type (separating vs. closed-end) is key.
- A detached or loose slider is often a quick, 5-minute fix.
- Basic maintenance can prevent most zipper failures.
Demystifying Zipper Breakdowns: Why Do They Fail?
Zippers are ingenious devices, but they take a lot of wear and tear. Understanding why they fail is the first step toward a successful repair. Many issues stem from simple mechanical faults rather than complete destruction.
Common culprits include:
- The Slider’s Great Escape: Often, the slider detaches from the zipper track, usually because a top or bottom stopper broke or came loose.
- Misaligned Grins: Zipper teeth, or coils, can get bent out of shape, preventing the slider from engaging them properly.
- Missing Boundaries: Top or bottom stops, those little metal or plastic pieces that prevent the slider from flying off, can break or go missing entirely.
- The Tug of War: Applying too much force or zipping too fast puts undue tension on the fabric and slider, leading to wear.
- Old Age & Wear: Like any moving part, sliders can wear out over time, losing their ability to grip the teeth firmly.
The good news? Most of these issues are prime candidates for a home repair, rather than requiring a full replacement.
Your Essential Toolkit: Gear Up for Zipper Repair
Before you dive into the repair, gathering the right supplies is crucial. Think of this as your mission-critical equipment list. The great news is, you likely already own many of these items.
Here’s what you’ll need to master the essential tools and materials for zipper reattachment:
- Needle-Nose Pliers (Your MVP): This is non-negotiable. Needle-nose pliers are incredibly versatile for manipulating tiny metal parts. You'll use them to pry open and crimp stops, and gently tighten a loose slider. Look for a pair with fine tips for precision work.
- Replacement Slider or Zipper Stop (If Needed): If a component is genuinely broken or missing, you’ll need a replacement. Crucially, match the size and gauge. Most sliders have a number stamped on the back (e.g., "5" or "YKK 3")—this is your guide. For stops, bring the old one to the store or measure its dimensions.
- Scissors (Optional, but Handy): Useful for trimming loose threads that might snag the zipper, or for removing an old fabric stop.
- Small Flathead Screwdriver (Optional, for Gentle Prying): Sometimes a tiny flathead can help delicately pry open metal stops without damaging the surrounding fabric. Use with extreme caution.
- Thread and Needle (Optional, for DIY Stops or Reinforcement): If you can't find a replacement metal stop, a few tight stitches across the zipper tape can serve as a surprisingly effective temporary or permanent stopper. It's also great for reinforcing stress points.
- Lubricant (For Smooth Sailing): A sticky or stiff zipper is a common complaint. Various household items can act as excellent lubricants:
- Zipper wax: Specifically designed for the job.
- Graphite pencil: Rub the lead directly onto the teeth.
- Candle wax: A small amount rubbed on the teeth.
- ChapStick or lip balm: Works in a pinch.
- Bar of soap: Dry soap is surprisingly effective.
- Coconut oil: Apply sparingly with a cotton swab.
- Safety Glasses (Recommended): When prying metal parts, especially older, brittle ones, small pieces can sometimes fly off. Protect your eyes!
- Magnification Devices (Optional): For very small zippers or if your eyesight isn't what it used to be, a magnifying glass or a head-mounted magnifier can be a lifesaver.
- Fabric Clips or Masking Tape (Optional): These can help hold zipper tapes in perfect alignment, especially useful for long zippers or those on awkward items.
Know Your Zipper: Separating vs. Closed-End
Before any repair, identify your zipper's anatomy. This dictates how you'll approach reattaching the slider.
- Separating Zippers: Think jackets, hoodies, and coats. These zippers fully detach at the bottom, allowing the garment to open completely. When reattaching a slider to a separating zipper, you’ll typically work from the bottom, inserting both halves of the zipper into the slider.
- Closed-End Zippers: Found on jeans, bags, pillowcases, and many pouches. These have a permanent stop at the bottom, meaning the zipper doesn’t fully separate. For closed-end zippers, you’ll almost always reattach the slider from the top.
Assessing the Damage: Your Repair Roadmap
Before grabbing your pliers, take a moment to diagnose the issue. A proper assessment saves time and prevents further damage.
- Identify Your Zipper Type: As discussed, separating or closed-end?
- Examine the Slider: Is it completely off the track? Is it bent, warped, or just feeling loose? A loose slider might just need a gentle squeeze.
- Inspect the Teeth/Coils: Are they bent, missing, or misaligned? Minor bends (under one inch) are often repairable. Extensive missing teeth or severely crushed coils usually mean a full zipper replacement is needed.
- Check the Top/Bottom Stops: Are they broken, missing, or just loose? A missing stop is a common culprit for a slider going rogue.
- Note the Size: If you need a replacement slider or stop, look for the size number on the back of the slider (e.g., "5" or "YKK 3"). This ensures you get a compatible part.
Repair Feasibility Check:
- Easily Fixable: A detached or loose slider, a few bent teeth (less than an inch), or broken stops. These are your prime DIY candidates.
- Time for a Replacement (Slider or Full Zipper): If the slider is bent beyond repair, or if the zipper tape is torn, or you have more than an inch of missing or crushed teeth, it's often more practical to replace the slider or the entire zipper. Professional zipper replacement costs can range from $16 to $49, depending on the item and complexity.
The Step-by-Step: Reattaching Your Zipper Slider
Now, with your tools ready and diagnosis complete, let’s get that zipper back on track. For a more in-depth exploration of various zipper repair techniques, consider our comprehensive reattaching a zipper guide.
1. Preparing for Reattachment: Clear the Path
Start by cleaning the zipper. Use an old toothbrush or a stiff brush to remove any dirt, lint, or debris from the zipper teeth. Debris contributes to approximately 63% of outdoor jacket malfunctions, so this simple step is crucial for smooth operation.
2. The Great Escape: Removing the Old Top Stop
If your slider came off because of a broken top stop, or if you're reattaching from the top (common for closed-end zippers), you'll need to remove a top stop.
- Locate the top stop on one side of the zipper tape.
- Wearing safety glasses, use your needle-nose pliers to gently pry open the metal stop. If it's plastic, you might need to snip it carefully with scissors.
- Once loose, remove it.
3. Aligning the Tapes: The Foundation of a Good Zip
This step is critical for a smooth-running zipper.
- Align both zipper tapes evenly. Ensure the fabric on both sides is perfectly parallel and the teeth are lined up. This might require some careful tugging and straightening of the garment.
- If you're struggling to keep them aligned, consider using fabric clips or masking tape to hold them together just below where the slider will start.
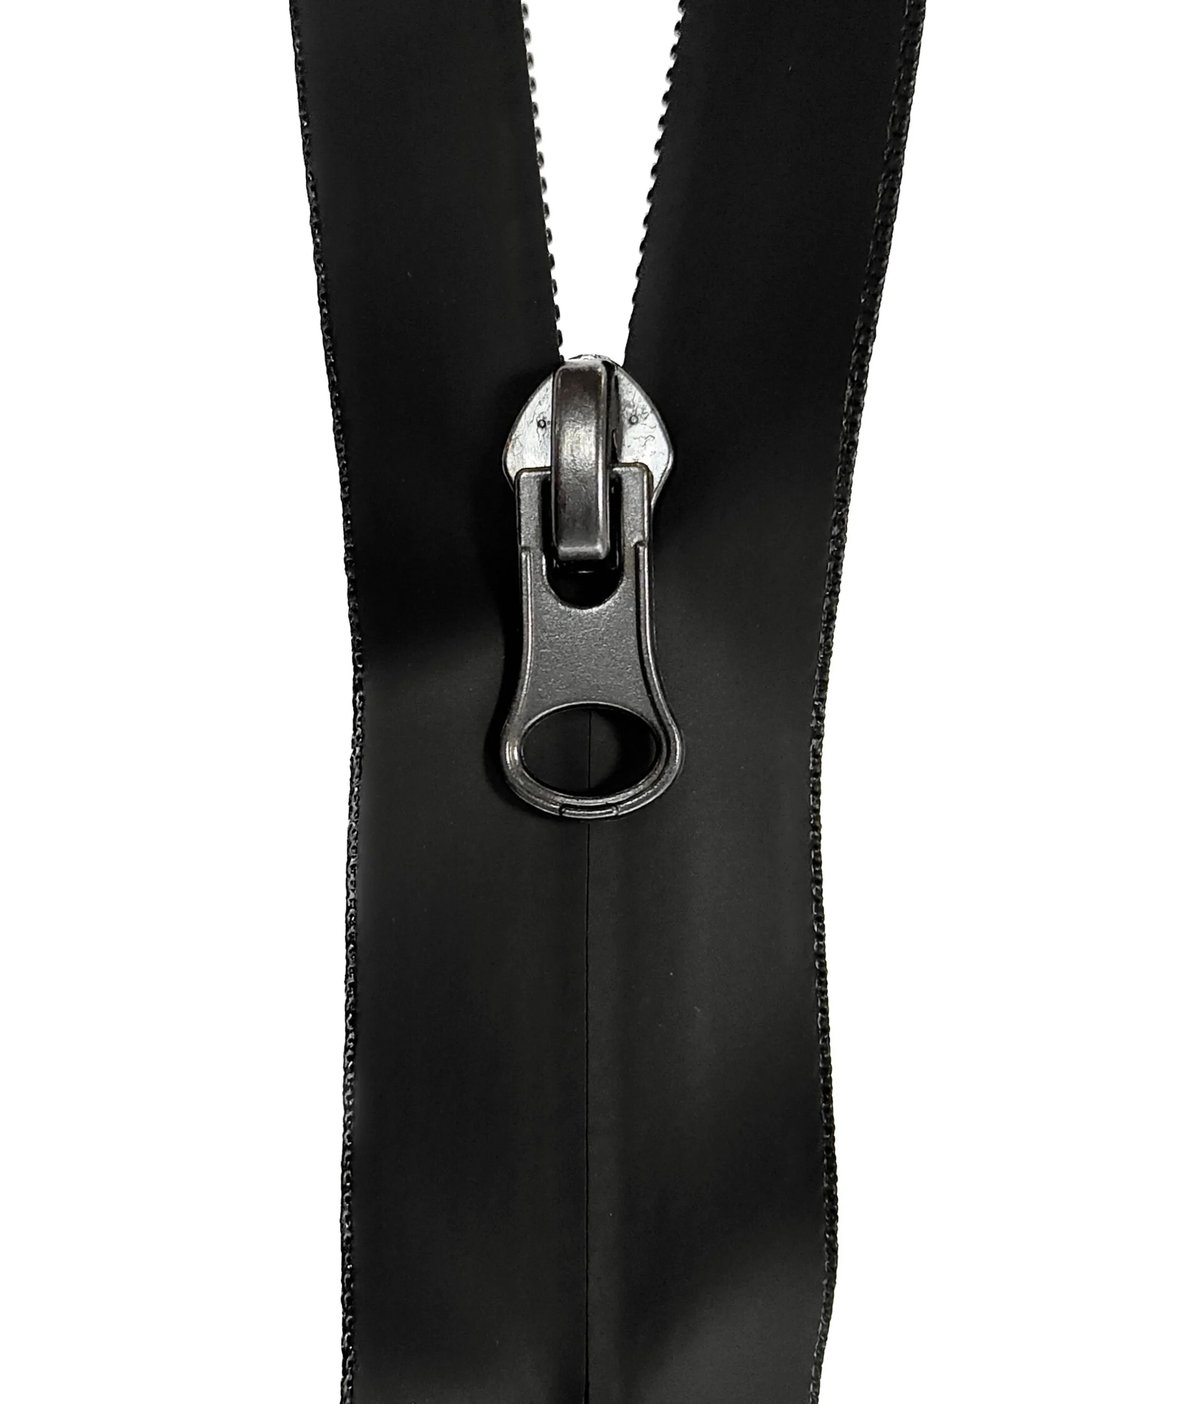
4. The Slider's Return: Reattaching with Precision
This is often the trickiest part, requiring patience and a steady hand.
- For Closed-End Zippers (from the top):
- Hold the two zipper tapes evenly.
- Orient the slider with its wider, open end facing down towards the zipper bottom.
- Carefully insert each side of the zipper teeth into the slider’s two openings simultaneously. This might take a few tries. Wiggle the slider gently, but avoid forcing it. The goal is to get both sets of teeth to feed into the slider's channel at the same time.
- Once both sides are started, gently pull the slider down a few inches to engage the teeth.
- For Separating Zippers (from the bottom):
- Orient the slider with its wider, open end facing up towards the top of the zipper.
- Insert the pin side of the zipper into the slider.
- Then, insert the box side of the zipper (the side with the open channel for the pin) into the other opening of the slider, pushing it down until it's fully seated.
- Once both ends are securely within the slider, gently pull the slider up to engage the teeth.
- Alternative for a Loose Slider (Not Detached): If your slider is still on the track but simply isn’t gripping the teeth, causing the zipper to split after zipping, you can often fix it. Gently crimp both sides of the slider with your needle-nose pliers. Do this incrementally, testing the zipper after each small crimp, to restore its tension and grip. Don't crimp too hard, or you'll jam it.
5. The Test Drive: Checking Your Work
Once the slider is back on, perform a full test.
- Zip the slider up and down several times.
- Does it move smoothly? Are the teeth interlocking perfectly?
- If it feels stiff or snags, apply lubricant (zipper wax, graphite pencil, candle wax, etc.) directly to the zipper teeth. Zip it up and down a few more times to distribute the lubricant.
- If the teeth don't close properly even after lubrication, the slider might be too worn or damaged, and may need replacement.
6. Securing the Top Stop: Finishing the Job
You’re almost there! Now, you need to ensure the slider won't escape again.
- Position the original top stop (if it's salvageable) or a new replacement stop where it was removed. Ensure it's slightly below the very top edge of the zipper tape, leaving enough room for the slider to rest when fully closed.
- Use your needle-nose pliers to clamp it tightly over the fabric and zipper tape. Give it a gentle tug with the slider to confirm it’s secure.
- DIY Stopper: If you don't have a replacement metal stop, you can create a robust fabric stopper. Thread a needle and sew several tight, thick stitches across the top of the zipper tape, forming a dense barrier that prevents the slider from going off track. Reinforce with a knot.
7. Final Adjustments and Reinforcement
Take a final look:
- Verify that both sides of the zipper start and end evenly.
- Inspect for any stray fabric or loose threads caught in the teeth, and trim them if necessary.
- For items that see heavy use (like a backpack or work jacket), consider adding a few extra stitches around the base or top of the zipper tape for reinforcement, especially if the fabric around the stop seems worn.
When to Replace: Slider vs. Entire Zipper
Sometimes, a quick reattachment isn’t enough. Knowing when to upgrade your repair strategy can save you frustration.
Replace the Slider: The 5-Minute Fix
- When: The slider is visibly bent, warped, or too loose to grip the teeth properly, even after attempting to crimp it. This is also the solution if the zipper continually separates behind the slider after reattachment.
- How: This is typically a quick, 5-minute fix. You'll remove the old top stop, slide off the old slider, slide on the new one (ensuring it's the correct size), and reattach the top stop.
Replace the Entire Zipper: When Damage is Extensive
- When: The zipper teeth themselves are missing or crushed over a significant section (more than an inch). The zipper tape (the fabric strip) is torn or frayed beyond repair. This is a more involved repair, often requiring sewing skills or a trip to a tailor.
- How: This involves carefully seam ripping the old zipper out and sewing a new one in. Professional zipper replacement can range from $16 to $49, depending on the item, material, and complexity. For items like tent doors or sleeping bags, it might be worth the professional investment.
Quick Fixes for Zipper Emergencies
Sometimes, you need an immediate, temporary solution to get you through the day.
- Paperclip or Keyring for a Missing Pull Tab: If the original pull tab snapped off, thread a paperclip or small keyring through the slider’s hole. It’s not elegant, but it works!
- Safety Pin as a Makeshift Stopper: If a top stop is missing and the slider keeps escaping, thread a safety pin through the zipper tape above where the slider should stop. This prevents it from coming off completely.
- Rubber Band for Jeans (or other items): If the zipper on your jeans won’t stay up due to a weak slider, loop a strong rubber band through the slider’s pull tab, then loop the other end over your button before fastening. This creates tension to keep the slider in place.
Zipper Maintenance: An Ounce of Prevention
The best fix is often preventing the problem in the first place. Good zipper hygiene significantly extends their lifespan.
- Keep Them Clean: Regularly use a toothbrush or a damp cloth to remove dirt, lint, and debris from zipper teeth. This simple act drastically reduces friction and snags. Remember, debris causes a significant percentage of outdoor jacket malfunctions.
- Lubricate Occasionally: For daily-use items, apply zipper wax, graphite, or silicone spray every few months. This keeps the slider gliding smoothly and reduces wear on both the slider and the teeth.
- Don't Force It: If a zipper snags, stop immediately. Don��t tug harder! Gently pull the fabric away from the teeth, realign, and try again. Forcing it is a sure way to bend teeth or break the slider.
- Inspect Regularly: Take a moment to check your zippers for loose threads, early signs of bent teeth, or a wobbling slider. Catching these minor issues early can prevent major headaches down the line.
Armed with the essential tools and materials for zipper reattachment, you're now ready to tackle most common zipper problems. It's a skill that will save your favorite jacket, backpack, or even a beloved pair of jeans, proving that a little DIY effort goes a long way. So, next time a zipper acts up, don't despair—repair!