The moment a zipper gives up the ghost – whether it’s snagging, separating, or flat-out refusing to move – it can feel like a small apocalypse for your favorite jacket, trusted backpack, or even a critical piece of outdoor gear. Suddenly, a perfectly good item is rendered practically useless, and the thought of Troubleshooting Common Zipper Reattachment Problems might seem daunting. But before you banish that beloved item to the back of the closet or the trash bin, take a breath. Many common zipper woes, especially those involving the slider coming off the track or failing to properly engage, are surprisingly fixable with a little know-how and a few simple tools.
Getting a zipper back on track, or ensuring it stays there, isn't just about a quick fix; it’s about understanding the mechanics and applying the right solution. Often, what appears to be a major repair is merely a minor adjustment waiting to happen.
At a Glance: Your Quick Guide to Zipper Fixes
- Stuck Zipper? Clean it thoroughly and lubricate with household items like candle wax or graphite.
- Slider Not Closing Teeth? Your slider might be worn out; replacing it is often the best long-term solution.
- Slider Coming Off the Track? A missing or damaged stopper is usually the culprit; a new stopper is an easy fix.
- Broken Zipper Teeth? If only a few at the end, shortening the zipper might work. Otherwise, a full replacement is likely needed.
- Avoid Force: Never yank a stuck zipper; you'll only worsen the damage.
- Lubrication is Key: Regular lubrication prevents many common issues before they start.
- Check Warranty First: Before DIY, see if your product is covered for professional repair.
The Frustration Factor: Why Zippers Fail (and How to Spot It)
Zippers are remarkably robust when designed and used correctly. They’re a feat of engineering, providing a secure, convenient closure with hundreds of tiny interlocking parts. Yet, they face constant friction, stress, and exposure to the elements, making wear and tear inevitable. Understanding why a zipper fails is the first step toward a successful fix.
Most reattachment problems stem from issues with the zipper's slider or the integrity of its teeth and tape. A slider that's too wide or too narrow for the teeth, or one that has simply worn out over time, won't properly "zip" the teeth together, leading to separation or the slider coming completely off. Similarly, damaged teeth or a missing stopper at the top or bottom of the zipper tape create easy escape routes for the slider.
Let's dive into the specifics of these common issues and how you can tackle them.
Stuck Zippers: The Pesky Snags and Grinds
Few things are more annoying than a zipper that refuses to budge. You pull, it grinds, and then…nothing. Or worse, it snags a piece of fabric, and you're left with a crumpled mess and a very stuck slider.
What’s Really Going On?
The most common culprits for a stuck zipper are:
- Fabric or threads: A stray piece of lining, a loose thread, or even the main garment fabric getting caught in the teeth.
- Debris: Lint, dust, sand, or dried-on detergent residue can accumulate between the teeth, hindering smooth movement.
- Bent slider: If the slider itself is slightly deformed, it won't glide correctly, often leading to a persistent jam.
Your Simple Solutions
Before you reach for the pliers (resist the urge!), try these gentle approaches:
- Free the Fabric: If fabric is caught, carefully pull it away from the slider. You might need fine-tipped tweezers or a needle to tease out stubborn threads. Work slowly, wiggling the slider gently back and forth, not forcing it.
- Clean House: Grab an old toothbrush or a stiff brush and give the zipper teeth a good scrub. Use a bit of soapy water for really grimy zippers, then rinse and let it dry completely. This removes lint, dust, and residue that acts like tiny brakes.
- Lubricate, Lubricate, Lubricate: This is your secret weapon.
- Candle Wax: Rub a plain, uncolored candle (paraffin wax works great) along both sides of the zipper teeth.
- Graphite: A pencil lead (the graphite inside) also works wonders. Just rub it directly onto the teeth.
- Zipper Lubricant: For a more specialized approach, consider choosing the right zipper lubricant designed specifically for zippers, especially for outdoor gear where performance matters.
Apply your chosen lubricant generously, then gently work the slider up and down to distribute it.
If the slider is visibly bent, you might be able to very carefully use a pair of pliers to gently reshape it, but this is a delicate operation. Too much force, and you'll crack or break the slider entirely, necessitating a replacement.
The Worn-Out Slider: When the Teeth Don't Engage
This is perhaps the most common "reattachment" problem: you zip up, but the teeth either don't connect at all, or they connect for a moment and then separate right behind the slider. The zipper tape seems fine, but the slider just isn't doing its job.
What’s Really Going On?
Think of the zipper slider as a small, precision-engineered clamp. It has two channels that feed the zipper teeth together, pressing them to interlock. Over time, especially with frequent use or if the slider is made from lower-quality materials, these channels can widen slightly or become worn. This loss of tension means the slider can no longer apply enough pressure to properly compress and lock the teeth together, leading to misalignment or separation.
Your Simple Solution: Replace the Slider
Attempting to "squeeze" the slider with pliers is a temporary, often damaging fix. While it might work once or twice, it typically compromises the slider's integrity, leading to a quick return of the problem or outright breakage. The best and most reliable fix for a worn-out slider is replacement.
Here’s how to approach it:
- Identify Your Zipper Type: Zippers come in various types (coil, Vislon/plastic molded, metal) and sizes. The most crucial part is matching the type and size of your existing zipper. Look for a number stamped on the back of the slider (e.g., 3, 5, 8, 10). This indicates the zipper gauge. You'll need a replacement slider that matches this number and the zipper material.
- Remove the Old Slider:
- From the top: If your zipper has a stop at the top, you might need to carefully pry it off (use pliers) to slide the old one off.
- From the bottom: For zippers where the slider attaches at the very bottom (like on a jacket), you'll often need to remove the bottom stop to get the slider off.
- Cutting: In some cases, if the zipper is easily accessible, you might carefully snip the very top or bottom of the zipper tape to free the old slider.
- Install the New Slider:
- Prepare the Zipper: Get the two sides of the zipper tape perfectly aligned at the point where the slider will start.
- Slide On: Gently feed the teeth of both sides into the two channels of the new slider. This can be tricky and requires patience. Start by getting one side in, then carefully manipulate the other.
- Test: Once it's on, gently pull the slider up and down to ensure it moves smoothly and, critically, that it properly interlocks the teeth without separation.
- Reattach Stops: If you removed any top or bottom stops, you'll need to install new ones (available in zipper repair kits) to prevent the slider from coming off the track again. If you're wondering Learn how to reattach a zipper properly, getting the slider on and securing the stops are core steps.
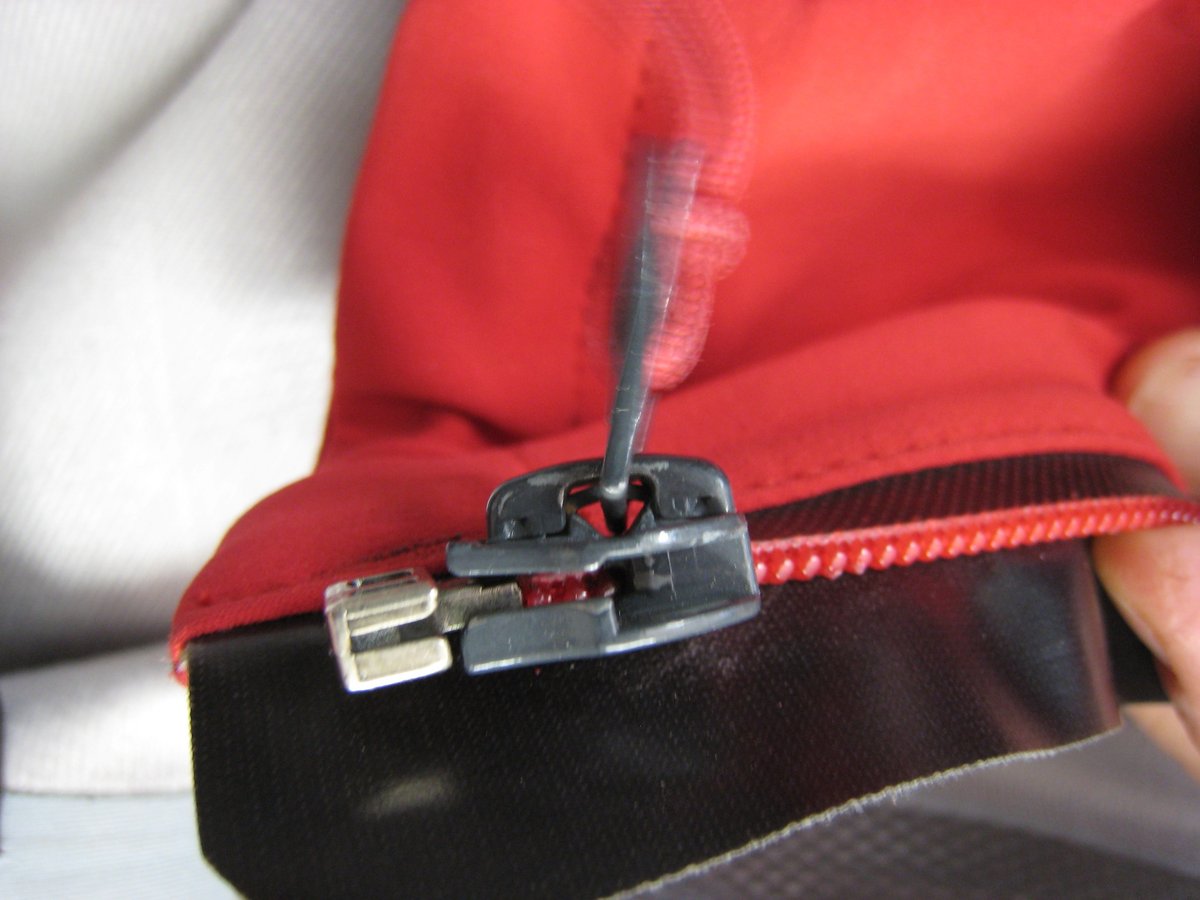
Slider Off the Track: A Missing Boundary
You've got your slider, but it's just…floating freely, completely detached from the zipper teeth. This usually means it's come off the end of the zipper tape, leaving your garment gaping open.
What’s Really Going On?
This almost always points to a problem with the zipper stops – the small metal or plastic pieces at the very top and bottom ends of the zipper tape. These stops act as physical barriers, preventing the slider from traveling too far and coming off the track. If a stop is damaged, missing, or wasn't properly installed by the manufacturer, the slider has nowhere to go but off the rails.
Your Simple Solution: Install a New Stop
If your zipper tape itself isn't torn or damaged, this is one of the easiest fixes:
- Retrieve the Slider: First, get the slider back onto the zipper teeth. This is similar to installing a new slider: align the two sides of the zipper tape, then carefully feed them into the slider's channels.
- Identify the Missing Stop: Determine if it's the top stop (at the very end where the zipper finishes) or the bottom stop (at the base, for separating zippers like on jackets).
- Install a New Stop: Zipper repair kits often come with various stops.
- Top Stops: These are usually U-shaped pieces of metal that crimp onto the very edge of the zipper tape, just above the point where the slider rests when fully closed. Use pliers to firmly press them into place.
- Bottom Stops: For separating zippers, the bottom stop is typically a larger box-and-pin assembly. If just the metal stop is missing, you can crimp a new, compatible stop onto the tape.
- Temporary Fix: In a pinch, for a top stop, you can tightly wrap a strong thread (like dental floss) around the very end of the zipper tape, creating a makeshift barrier. A small cable tie can also work as a temporary bottom stop on a non-separating zipper.
- Test Thoroughly: Once the new stop is in place, move the slider up and down several times, ensuring it hits the stop and doesn't come off.
If the track itself is deformed or the zipper tape is torn where the stop should be, professional help or a full zipper replacement might be the only option.
Broken Zipper Teeth: A Structural Problem
A missing or damaged tooth can bring a zipper to a grinding halt. Even one small break, especially in a high-stress area, can prevent the slider from properly engaging the remaining teeth.
What’s Really Going On?
Zipper teeth, whether metal or plastic, are designed to interlock precisely. If even one tooth is bent, chipped, or completely missing, it creates a gap that the slider cannot bridge effectively. This leads to the teeth separating above or below the damaged spot, or the zipper getting stuck entirely. Causes often include excessive force, snagging on sharp objects, or simply material fatigue over time, especially with plastic zippers.
Your Solutions: Limited DIY, Often Professional
Unlike slider or stop issues, broken zipper teeth often signal a more significant problem, and DIY options are limited:
- If the Broken Tooth is at the End: If the damaged tooth (or teeth) is located at the very top or bottom of the zipper, you might be able to shorten the zipper. This involves carefully cutting off the damaged section and then installing a new top or bottom stop above the new end. This works best for non-separating zippers or where you can afford to lose a bit of zipper length.
- If the Broken Tooth is in the Middle: This is where DIY usually hits a wall. Replacing individual teeth is generally not feasible for consumers. A single broken tooth in the middle of the zipper run typically means the entire zipper needs to be replaced. This is a more involved repair, often requiring sewing skills and specialized tools.
For garments or gear with a central broken tooth, or if you're uncomfortable with extensive sewing, it's often best to seek a professional tailor or repair service. They have the expertise and equipment to seamlessly replace the entire zipper, restoring your item to full functionality.
Zipper Selection: Preventing Future Headaches
While we're focused on troubleshooting, a quick word on zipper quality can prevent many future problems. Manufacturers use different zippers for a reason, and understanding those differences can inform your purchasing decisions and maintenance approach:
- Metal zippers: Often found on jeans, boots, and heavy-duty bags. They are incredibly durable and resistant to wear, making them ideal for high-stress applications.
- Nylon coil zippers: Lightweight, flexible, and common in clothing and lighter bags. Good for items needing a delicate touch.
- Plastic Vislon zippers: Distinctive, larger teeth. Durable and excellent for outdoor gear, jackets, and marine applications due to their resistance to corrosion.
- Waterproof zippers: Essential for outdoor products, designed to keep moisture out, preventing both water damage and rust on the zipper components.
- Invisible zippers: Used in high-end garments for a seamless aesthetic. While delicate in appearance, quality invisible zippers are still quite robust.
Choosing products with the right zipper type for their intended use is a proactive step in avoiding reattachment and other issues down the line. When exploring different zipper types, you'll see why a heavy-duty jacket zipper wouldn't work on a delicate dress and vice versa.
Long-Term Maintenance: The Ounce of Prevention
Even the highest quality zipper needs a little love to last. Regular care can significantly extend its lifespan and prevent those frustrating reattachment woes.
- Keep it Clean: Dirt, dust, and lint are your zipper's enemies. Regularly brush the zipper area with a soft brush or use an air blower to remove debris. For persistent grime, a gentle wipe with a damp cloth and mild soap, followed by thorough drying, works wonders. This is especially true for zippers on outdoor gear and tents. If you want to dive deeper into specific care for outdoor gear zippers, there are dedicated guides for that rugged equipment.
- Lubricate Regularly: Think of it like oiling a bike chain. A zipper-specific lubricant, wax, or even graphite from a pencil significantly reduces friction, ensuring smooth slider operation and preventing sticking. Apply it every few months for frequently used items, or before and after exposing gear to harsh conditions (sand, salt water, extreme cold).
- Inspect for Wear: Make it a habit to glance at your zippers for early signs of trouble. Are any teeth bent or discolored? Is the slider looking worn or loose? Catching these issues early can prevent them from escalating into full-blown failures. A slightly bent tooth might be gently straightened, or a worn slider replaced, before it causes major separation issues.
When to Call in the Pros (or Just Get a New One)
While many zipper reattachment problems are within your DIY grasp, there are times when it's wiser to seek professional help or consider a full replacement.
- Check Your Warranty: Before you grab any essential tools for DIY zipper repair, always check if your product is still under warranty. Many reputable manufacturers offer free repair or replacement for faulty zippers, especially if the issue is due to a material defect. Attempting a DIY fix might void your warranty, so a quick call or email to customer service with a photo of the damage and proof of purchase could save you time, money, and hassle.
- Extensive Damage: If the zipper tape is torn, significantly stretched, or if multiple teeth are missing in the middle section, a full zipper replacement is likely necessary. This is a more complex job that often requires specific sewing machines and expertise.
- High-Value Items: For expensive jackets, outdoor gear, luggage, or specialized equipment, a professional repair ensures the job is done correctly, preserving the item's functionality and aesthetic. They can often match original zippers or recommend the best durable alternatives.
- Beyond Your Comfort Level: If you're simply not comfortable with sewing or the intricate process of slider replacement, there's no shame in handing it over to a professional. A skilled tailor or repair shop can usually fix a zipper quickly and affordably. Sometimes, knowing when a full zipper replacement is needed rather than a repair is the smarter economic choice.
Moving Forward with Confidence
Dealing with a faulty zipper can be a nuisance, but it doesn't have to be a disaster. By understanding the common causes of zipper reattachment problems and arming yourself with a few simple fixes, you can bring many of your favorite items back from the brink. Remember, patience is key, and a little preventative maintenance goes a long way. So, next time a zipper acts up, you'll know exactly how to tackle it, saving your belongings and your sanity.